There are various ways around this problem - you can move you model into the shade where the light is more even, you can use a modern automatic camera that fires a small amount of electronic flash to lighten up the dark areas, or you can use a reflector to bounce direct light back into the shadow areas. That reflector can be a bedsheet, or a commercial collapsable reflector such as those made by Lastolite. The latter are very convenient, but expensive for the larger sizes, and generally need an assistent to direct them.
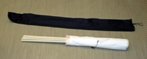
What I describe here is cheap, portable, free-standing reflector that can be quickly built
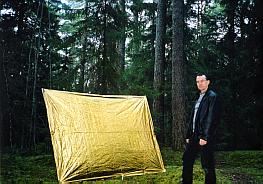
from readily-available materials. It rolls up to a 1m x 6cm tube, and opens up to a 2m x 1.5m
or 1m x 1.5m screen that can reflect 4 different qualities of light.
The materials cost less than $10, and initial construction time is around 30 mins.
Subsequent assembly takes about 30 seconds.
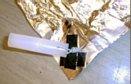 First reinforce with adhesive tape a 6cm square patch at each corner of the space blanket
and in the middle of each long side. I used two pieces of electric tape followed by
wide packing tape, just to be safe.
Space blankets are surprisingly strong, but can be torn by the high pressure from
string under tension.
Then drill a hole through the end of 6 of the
conduit sleeves, make two holes in each of the reinforced patches, and tie a sleeve
to each patch on the blanket. Attach the rest of the conduit sleeves to one end
of 4 of the conduit pipes (if you are lucky, you can buy conduit with joints
already moulded on one end, in which case you need only buy the 6 sleeves for the blanket,
and you can cut the moulded ends off two of the conduits, so that you only have 4 female
ends on 4 pipes). Attach short loops of elastic string to each corner of the net curtain.
And that's it.
You can now roll up your poles in the blanket, and carry them in a slim case to your photo shoot.
First reinforce with adhesive tape a 6cm square patch at each corner of the space blanket
and in the middle of each long side. I used two pieces of electric tape followed by
wide packing tape, just to be safe.
Space blankets are surprisingly strong, but can be torn by the high pressure from
string under tension.
Then drill a hole through the end of 6 of the
conduit sleeves, make two holes in each of the reinforced patches, and tie a sleeve
to each patch on the blanket. Attach the rest of the conduit sleeves to one end
of 4 of the conduit pipes (if you are lucky, you can buy conduit with joints
already moulded on one end, in which case you need only buy the 6 sleeves for the blanket,
and you can cut the moulded ends off two of the conduits, so that you only have 4 female
ends on 4 pipes). Attach short loops of elastic string to each corner of the net curtain.
And that's it.
You can now roll up your poles in the blanket, and carry them in a slim case to your photo shoot.
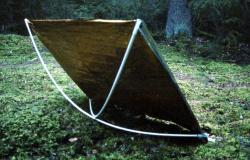
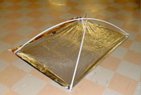 To rig the complete reflector, simply assemble two conduits with 3 sections in each,
and insert the ends into the attachments on diagonal corners of the sheet, to form a cross.
This cross should be larger than the blanket, so that it bows out to form a stand, and
also stretches out the blanket. If you want a smaller reflector, you can put only 2
sections into each conduit pipe, and use the connectors in the middle of the blanket sides,
folding over the excess blanket to form a double layer. To make the reflector stand,
you must join the crossing conduits with a rubber band somewhere near their middles.
The exact position determines the angle at which the reflector stands. A small weight
attached to the bottom edge will help with positioning.
To rig the complete reflector, simply assemble two conduits with 3 sections in each,
and insert the ends into the attachments on diagonal corners of the sheet, to form a cross.
This cross should be larger than the blanket, so that it bows out to form a stand, and
also stretches out the blanket. If you want a smaller reflector, you can put only 2
sections into each conduit pipe, and use the connectors in the middle of the blanket sides,
folding over the excess blanket to form a double layer. To make the reflector stand,
you must join the crossing conduits with a rubber band somewhere near their middles.
The exact position determines the angle at which the reflector stands. A small weight
attached to the bottom edge will help with positioning.
If you want maximum fill-in, assemble with the silver side outwards. If you want a warmer light, use the gold side, and if you want a softer, weaker fill, clip the net curtain over the surface of the reflector.